Veggie Staples

dairy free, gluten free, refined sugar free, plant based recipes

  • Home
  • About
  • Recipe Index
    • Appetizers & Sides
    • Breakfast
    • Desserts & Baked Goods
    • Entrees
    • Smoothies & Drinks
  • Health & Wellness
    • Health & Wellness
    • Book Reviews
    • Weight Loss
    • Workouts

Paleo & Gluten Free Chocolate Peppermint Pinwheel Cookies

December 11, 2020 · by Meg · 3 Comments

Paleo & Gluten Free Chocolate Peppermint Pinwheel Cookies

IMG_2329

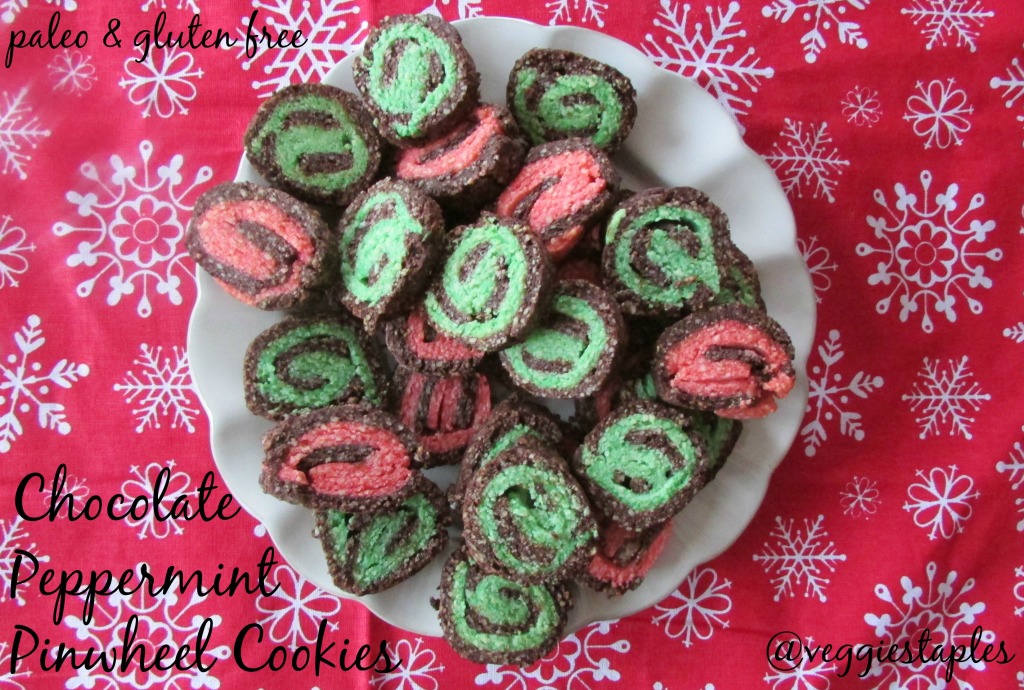
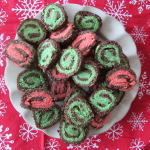
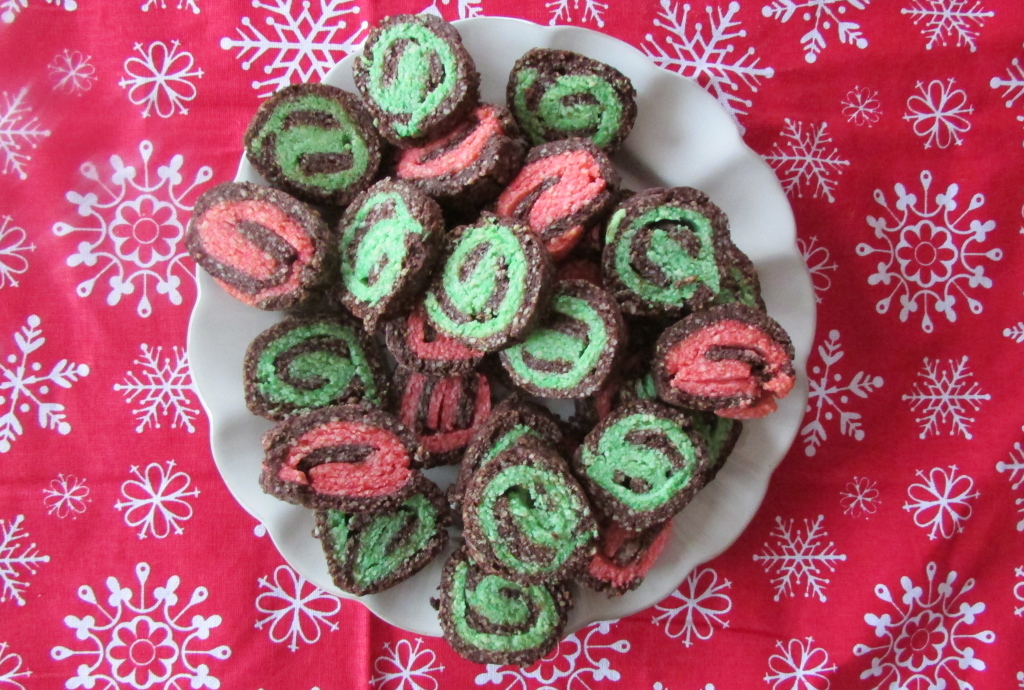
The Holidays are here! What is your favorite way to celebrate? My friend is hosting a cookie swap in a few weeks, and these Chocolate Peppermint Pinwheel Cookies (Gluten Free & Paleo) are an oldie but goodie for any holiday party! They incorporate that lovely combination of chocolate and peppermint that everyone is sure to love! And better yet, they are sweetened with natural honey! I was lucky enough to get some Nektar Honey Crystals on my hands from Nektar Naturals! (Thank you Nektar Naturals!) I used this as a healthy sugar substitute, (as I always do), and they still were a big hit. How awesome is that?

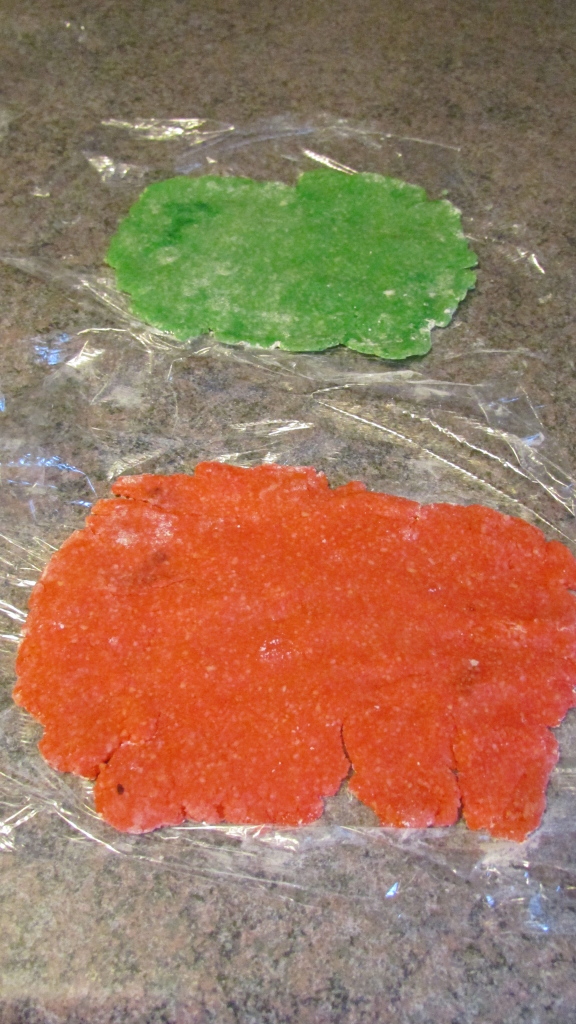
Who can resist such cute spirals? I had a few mishaps (I decided to use coconut sugar, which is brown… guess what? brown sugar does not take color dye, whoops!). I found these awesome natural food dyes after scouring the internet, and they worked really well! I was really impressed with the coloring, I wasn’t sure if they would turn out muddy or too dull. I would have been upset if I had ended up with pink instead of red! Anyways, if you are into Chocolate Peppermint (my whole family is obsessed) you will really love these cookies! Did I mention they are also gluten free and paleo? Note: If you do use coconut sugar in this recipe, the color will not turn out! Don’t learn the hard way like I did! I recommend using Nektar Naturals honey crystals!!

And don’t forget to head on over to my instagram account for a Nektar Naturals giveaway!

*Nektar Naturals can be found in any Walmart!!

IMG_2293 IMG_2296


IMG_2299

5.0 from 1 reviews
Print
Paleo & Gluten Free Chocolate Peppermint Pinwheel Cookies
Author: Meg Staples
Recipe type: Cookie
Prep time:  75 mins
Cook time:  10 mins
Total time:  1 hour 25 mins
Serves: 24 cookies
 
Ingredients
  • 3 cups almond flour
  • ¾ cup honey crystals, stevia or truvia
  • 1 egg
  • 4 tablespoons coconut oil, melted
  • 3 tablespoons raw cacao powder
  • 1 tablespoon almond or coconut milk
  • 1 teaspoon vanilla extract
  • 1 teaspoon peppermint extract
  • 1 teaspoon baking soda
  • green & red food coloring to liking
Instructions
  1. In a small bowl, whisk flour and baking soda.
  2. In a large bowl or in an electric mixer, beat honey crystals and coconut oil until fluffy (around 3 minutes)
  3. Beat in egg and vanilla into the honey crystals and coconut oil
  4. Add flour and baking soda, reduce mixer to low or beat until just blended
  5. Divide dough in half and place in two bowls
  6. Stir in cacao and milk into one bowl, stir in peppermint into the other bowl
  7. Divide peppermint dough in half and place in separate bowls
  8. Mix the red food coloring into one peppermint dough, green into the other
  9. Divide the chocolate dough in half
  10. Shape all the dough pieces into 3 X 5 inch rectangles, set on wax paper or parchment paper and place another piece of paper on the top for easy rolling
  11. Roll out dough into 9 X 12 inch rectangles.
  12. Refrigerate rectangles in the refrigerator for at least an hour
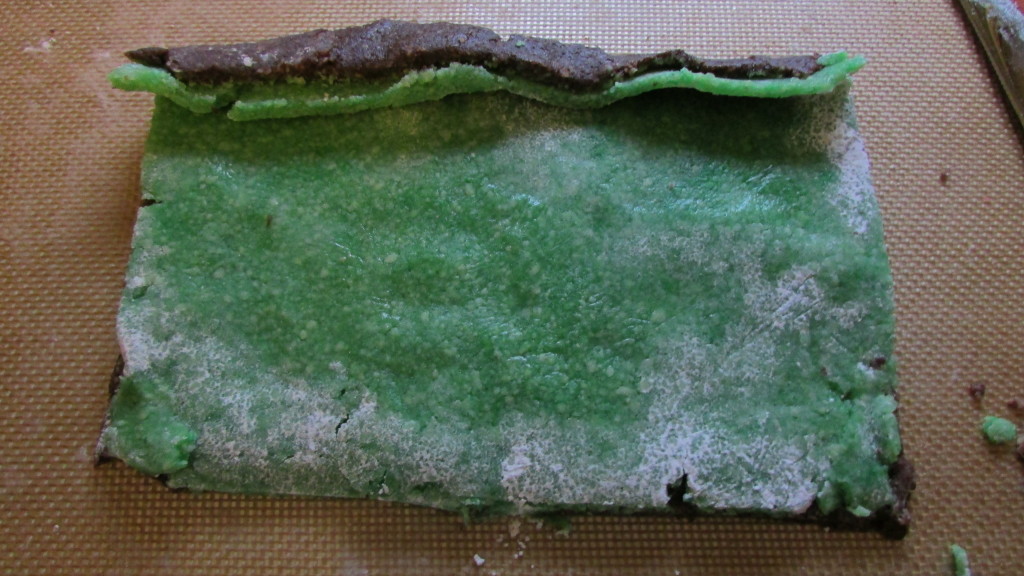
  13. Place 2 chocolate rectangles on a floured work surface (I like using arrowroot or tapioca flour)
  14. Remove from sheets of wax paper
  15. Lightly brush the chocolate dough with water (helps with sticking)
  16. Place red dough on top of one chocolate dough, place green dough on top of the other
  17. Trim edges if the dough shapes are uneven
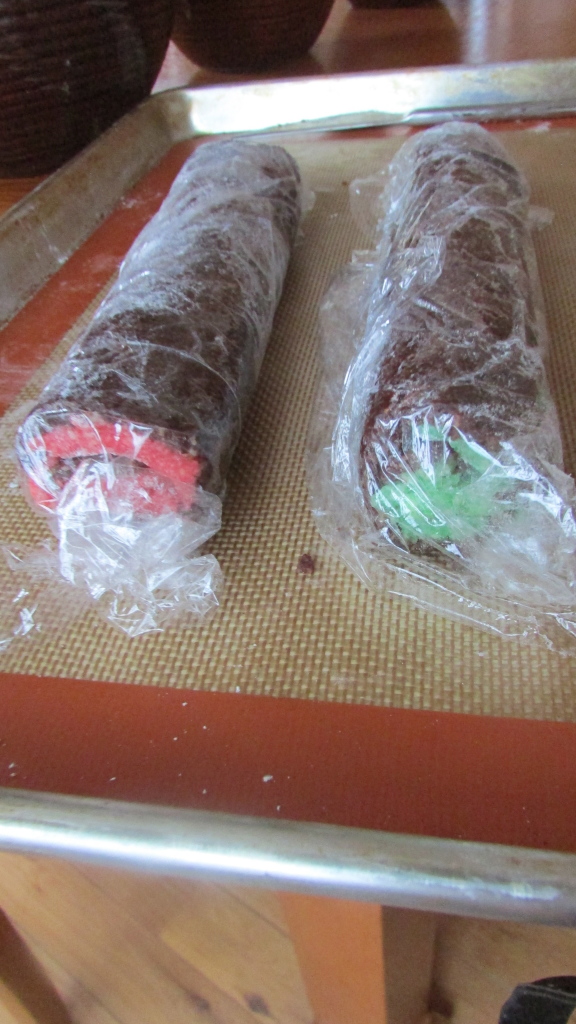
  18. Roll dough together (from the long side) into a log form (both green and red dough)
  19. Roll dough tightly so the log is compact
  20. Wrap dough in plastic wrap/saran wrap for at least 3 hours
  21. Preheat oven to 350 degrees
  22. Remove logs from refrigerator and unwrap
  23. Cut logs into ¼ inch thick cookie slices
  24. Place 1 inch apart on greased cookie sheet or Silpat
  25. Bake 10-15 minutes, until the edges begin to brown, rotating half way through
3.5.2019

paleoglutenfreechocolatepeppermintpinwheelcookies

Filed Under: Desserts & Baked Goods, Uncategorized · Tagged: allergen free, chocolate, christmas, cookie, dairy free, dessert, gluten free, grain free, healthy, paleo, party, peppermint, spiral, treat, vegetarian

Easy Gluten Free Banana Pumpkin Muffins

September 23, 2020 · by Meg · Leave a Comment

Easy Gluten Free Banana Pumpkin Muffins

IMG_3402

Well fall has finally rolled into town. Temps down in the 40’s at night, high 60’s & low 70’s during the day. I am in the mood to bake again. 90 degree temps until the 3rd week in September + being back at school +  marathon training = not really wanting to be in the kitchen (and no time). So sorry for the lack of blog posts. Now that things have settled into a routine, and marathon training is tapering, I’m hoping to get back into the blogging routine. I miss it, and I hope you’ve missed me too! Summer was hectic (lots of traveling) so I decided to take a little break from Veggie Staples, although I feel like I need a vacation from all of my vacation traveling! Do you ever feel like that sometimes?

Well along with fall, pumpkin season is also back in full swing (and anyone that knows me knows I love my pumpkin). I had some mushy bananas in the bowl on the counter so I decided to whip up some pumpkin banana muffins - Zoey was into them! I love that she eats ‘regular’ food now, and I can make food or other treats like these muffins that she can eat! I made these for a baby shower - also a big hit! I know you will love them too!

Print
Easy Gluten Free Banana Pumpkin Muffins
Author: Meg Staples
Recipe type: Muffin
Prep time:  10 mins
Cook time:  20 mins
Total time:  30 mins
Serves: 8 muffins
 
Ingredients
  • 1 very ripe banana
  • ¾ cup pureed pumpkin
  • ¾ cup almond flour
  • 2 eggs
  • 2-3 tablespoons pumpkin pie spice (depending on how big of a pumpkin fanatic you are!!)
  • 1 tablespoon coconut oil, melted
  • 3 teaspoons baking powder
  • 2 teaspoons cinnamon
  • optional: 2-4 tablespoons stevia, or enjoy life chocolate chips!
Instructions
  1. Preheat the oven to 400 degrees
  2. Mix all ingredients together in a whole (that easy!!)
  3. Grease or line muffin tin
  4. Fill cups (this batch will make ⅞ muffins)
  5. Bake in the oven for 20-25 minutes or until a toothpick comes out clean
3.3.2019


glutenfreebananapumpkinmuffins

Filed Under: Breakfast, Desserts & Baked Goods · Tagged: allergen free, banana, breakfast, cinnamon, dairy free, gluten free, grain free, healthy, muffin, paleo, pumpkin, quick, snack, vegetarian, yeast free

The Best Gluten Free ‘Sugar’ Cookies

August 22, 2020 · by Meg · 1 Comment

The Best Gluten Free ‘Sugar’ Cookies

We recently celebrated Zoey’s first birthday - I’m not really quite sure where 1 year went! Here she is shoving her face full of birthday cupcakes at school (gluten free & dairy free, of course)!!

zoeybirthday3

One thing I also sent to school with Zoey were these awesome ‘sugar’ cookies - they really are the best gluten free ’sugar’ cookies!!!! The kids really loved them and I don’t mind giving Zoey a treat knowing it’s gluten free and as ‘healthy’ as it can possibly be, not full of anything processed. Sometimes I think I’m crazy when I make everything homemade (time consuming), but at least I know what’s in them and what she’s eating - plus these really are the best gluten free ‘sugar’ cookies.

IMG_3342

You would never know I’ve replaced everything bad that comes in a normal sugar cookie and replaced it with much better ingredients! I also love making sugar cookies because I love all the fun cookie cutters you can use to make them way more fun - my Mom bought me a bag of 100 different cookie cutters last year for Christmas, and I don’t think I will ever have a shortage of any cookie cutter I’m looking for!

Print
The Best Gluten Free ‘Sugar' Cookies
Author: Meg Staples
Recipe type: Cookie
Prep time:  1 hour
Cook time:  8 mins
Total time:  1 hour 8 mins
Serves: 38-48 cookies
 
Ingredients
  • 1.5 cups Gluten Free Enjoy Life All Purpose Flour
  • ½ cup coconut oil, melted
  • ¼ cup coconut sugar
  • 1 egg
  • 1 tbsp vanilla extract
  • 1 tsp baking powder
Instructions
  1. Mix coconut oil & coconut sugar together
  2. *beating in a mixer will make it much easier, but not necessary
  3. Add the egg, vanilla extract, and beat until blended
  4. Add the flour and baking powder until completely combined.
  5. Remove from the bowl and roll into a ball.
  6. Place the ball of dough on a plate or in a ball (covered by plastic wrap or a dish towel) for 30-45 minutes.
  7. Preheat the oven to 350 degrees
  8. Remove dough from refrigerator and use extra gluten free all purpose flour to sprinkle on your countertop (I like putting some on my rolling pin too).
  9. Roll the dough out to the desired thickness (around ¼ inch seems to work the best)
  10. * I did mine in small sections, I just found this easier
  11. Cut the dough with your cutters and place onto your silpat or greased baking sheet
  12. *you’ll get 38-48 cookies depending on how big your cookie cutters are
  13. Bake for 8-10 minutes until the cookies are faintly golden brown on the edges.
  14. Allow to cool before eating! (I like this wire rack the best)
3.3.2019

glutenfreesugarcookies

Filed Under: Desserts & Baked Goods · Tagged: allergen free, cookie, dairy free, dessert, easy, enjoy life, gluten free, healthy, party, snack, sugar cookies, treat, yeast free

Gluten Free Orange Carrot Ginger Muffins

August 18, 2020 · by Meg · 1 Comment

Gluten Free Orange Carrot Ginger Muffins

IMG_3374

My husband’s favorite cake is carrot (okay, maybe second to chocolate). I had him test these out with the new Enjoy Life Muffin Mix that I used to create these Gluten Free Orange Carrot Ginger Muffins. All I have to say about his reaction is Winner, Winner, Chicken Dinner!! His eyes lit up when he took a bite of these!

They are super easy to put together, and they are just to die for! They are really great for a quick breakfast, but also for an awesome morning or afternoon snack. My daughter (who just turned 1), also devoured these, so kid friendly, especially because all those carrots are hidden!! The ginger makes is a little zesty, the orange makes it a little sweet - the perfect balance! Well, what are you waiting for, get to your kitchen to make these muffins!!

Print
Gluten Free Orange Carrot Ginger Muffins
Author: Meg Staples
Recipe type: Muffin
Prep time:  15 mins
Cook time:  15 mins
Total time:  30 mins
Serves: 9 muffins
 
Ingredients
  • 1½ cups Enjoy Life Muffin Mix (as prepared, I made mine with coconut oil)
  • ½ cup finely shredded carrots (you can use a cheese grater or a food processor)
  • 1 orange, zested
  • ¼ cup fresh squeezed orange juice
  • 2 teaspoons grated ginger (or dried ginger)
  • ½ teaspoon cinnamon
  • *extra coconut oil for greasing muffin tin or muffin liners
Instructions
  1. Preheat the oven to 350 degrees
  2. Prepare the muffin mix (as directed)
  3. Shred carrots with a cheese grater or food processor
  4. Place shredded carrots in a bowl and squeeze & zest the orange, adding it to the bowl of carrots
  5. Grate ginger & add to the carrots
  6. Add cinnamon
  7. Add the muffin mix to the carrot mixture, mixing until well combined
  8. Divide the mixture evenly among 9 muffin tins
  9. Bake for 15 minutes or until a toothpick or knife comes clean
  10. Allow to cool before devouring!
3.3.2019


glutenfreeorangecarrotgingermuffins

Filed Under: Breakfast, Desserts & Baked Goods · Tagged: allergen free, appetizer, breakfast, carrot, cinnamon, dairy free, dessert, easy, enjoy life, ginger, gluten free, healthy, muffin, orange, snack, treat, vegetarian, weight loss

Chocolate Coconut Tartlets

August 16, 2020 · by Meg · Leave a Comment

Chocolate Coconut Tartlets

IMG_3392
T
here are not many things I love much more than the chocolate & coconut pairing! I was recently gifted the new Enjoy Life Baking Mixes!! They are SO easy to use - add water & oil (I like coconut oil best) & they taste SO good! Also a plus: they are incredibly versatile)! Multi purpose mix, muffin, pancake, waffle, brownie & pizza mixes?!! They did not disappoint! Even my husband loves everything I’ve made! (Note: All enjoy life products are free of the top 8 allergens: wheat/gluten, dairy, peanuts, tree nuts, egg, soy, fish and shellfish free!. Products are also made without casein, potato, sesame and sulfites.

I’m sharing with you today one of the new recipes I tested out with the multi purpose flour, these wonderful chocolate coconut tartlets!! I added it as the thickening agent for the creamy chocolate center in these beautiful little gems. I also used melted Enjoy Life Chocolate Chips for the filling! They are a must make for any chocolate coconut fan you have in your life. Perfect for dessert or a summer party, you can’t go wrong! I hope you enjoy them as much as we do!

Print
Chocolate Coconut Tartlets
Author: Meg Staples
Recipe type: Dessert
Prep time:  10 mins
Cook time:  40 mins
Total time:  50 mins
Serves: 12 tartlets
 
Ingredients
for the crust
  • 1½ cups unsweetened coconut shreds
  • ¼ cup coconut sugar
  • 2 egg whites
for the filling
  • ¾ cup almond milk
  • 4 ounces enjoy life chocolate chips
  • 6 tablespoons Enjoy Life Gluten Free All Purpose Flour Mix
  • 1 egg
  • ½ teaspoon vanilla extract
  • *coconut oil for greasing
  • *slivered almonds for topping, optional
Instructions
  1. Preheat the oven to 350 degrees
  2. Mix crust ingredients until they form a ball of ‘dough’
  3. Divide into 12 equal balls of dough
  4. In a lightly greased mini muffin pan, place balls of dough in each muffin tin, pressing your thumb into the dough to make a hole for the filling
  5. Place in the oven to bake for 10 minutes until the edges are brown
  6. While the coconut shells are baking, measure out chocolate chips and place them in the microwave for 30 seconds. They should be slightly melty. Mix together with a fork or whisk until completely melted, (*add more time in the microwave if needed, 10 seconds at a time)
  7. Add all other ingredients to the chocolate and whisk until well combined.
  8. Allow coconut shells to cool once they are finished.
  9. Once cooled (10 minutes or so) add filling (and sprinkle with slivered almonds, optional) and bake for another 10 minutes, or until a toothpick or knife comes out clean.
  10. Allow to cool before eating
3.3.2019

glutenfreechocolatecoconuttartlets

Filed Under: Desserts & Baked Goods · Tagged: allergen free, almonds, chocolate, coconut, dairy free, dessert, egg free, enjoy life, gluten free, healthy, party, snack, soy free, tart, tartlet, vegetarian, wheat free

Peanut Butter Cranberry Protein Bites

July 27, 2020 · by Meg · 1 Comment

Peanut Butter Cranberry Protein Bites

IMG_3321

With all of my running lately (in case I forgot to mention it, I’m training for my first marathon in October. Sometimes I wonder what I’m really thinking!), I’m needing easy, go to snacks for post run munching. These peanut butter cranberry protein are easy to carry with me, they travel well and they taste good. Plus, they really fill me up! All that protein from the protein powder, the peanut butter, dates and nuts. I left out the chocolate on these because if I’m out and about I dont’ want to worry about something melting in my purse or bag (and they are way less messy this way, too). The cranberries give them a beautiful hint of sweetness. Nutritious and delicious!

I could probably eat these all day. When I went to go shoot the photos for this post - look who jumped in?! Zoey just took her first steps this week, if we thought we were in trouble before, I think we were just fooling ourselves… What does this girl not find that is dangerous?
IMG_3306

You can swap out any protein powder for the one I used (I like this plant based powder, it’s plain, so I can add it to anything). I also love this peanut butter powder, there is nothing added to it, although I know a lot of people love this one (which would work just fine)! I know you will just love these for an anytime snack, just like Zoey & I do!!

meg

5.0 from 1 reviews
Print
Peanut Butter Cranberry Protein Bites
Author: Meg Staples
Recipe type: Snack
Prep time:  5 mins
Total time:  5 mins
Serves: 15 snack bites
 
Ingredients
  • 1 cup dates, pitted
  • ½ cup raw almonds
  • ¼ cup raw sunflower seeds
  • ¼ raw pumpkin seeds (pepitas)
  • ¼ cup (reduced sugar) dried cranberries
  • 1 scoop protein powder
  • 3 tablespoons jif powdered peanut butter
  • 1 tablespoon cinnamon
  • 1 tablespoon vanilla extract
  • water (if needed)
Instructions
  1. Buzz almonds (or nut of choice) and seeds in food processor or blender until fine
  2. Add remaining ingredients and buzz until the ‘dough’ begins to form a ball
  3. If the ‘dough’ is not solidifying, add 1 tablespoon of water (or non dairy milk) at a time until the dough does become a ball
  4. Remove dough from food processor or blender and divide into 15 equal balls (rolling each of the 15 sections into a ball, or 31 grams for each ball for each serving)
  5. Chill in the refrigerator & enjoy
3.3.2019

veganglutenfreepeanutbuttercranberryproteinbites

Filed Under: Appetizers & Sides, Breakfast · Tagged: allergen free, almond butter, cranberry, dairy free, easy, gluten free, grain free, healthy, no bake, no mess, peanut butter, protein, snack, vegan

Nut Free Strawberry Lemon Blender Muffins

June 27, 2020 · by Meg · Leave a Comment

Nut Free Strawberry Lemon Blender Muffins

IMG_3222

The other day my Mom & I went strawberry picking and we ended up with about 20 pounds of strawberries! It is definitely one of my favorite fruits… although, I never met a fruit I really didn’t like! I knew I had to act fast with my strawberries (I washed the rest and put them in the freezer), so my first thought was muffins. I kind of love muffins.

Jake does not like what he calls ‘chunks’, so I knew in order for him to taste test and enjoy them, they had to be ‘chunk’ free, hence the use of the blender. I didn’t mind though, it makes them easy. I also really love the combination of strawberry and lemon, (try my strawberry lemonade popsicles) so I thought I’d give that a whirl in putting these together. So, here they are, my nut free, strawberry lemon blender muffins. They are also paleo and gluten free, of course (not vegan, sorry). I love my eggs! What is your favorite flavor of muffin?

Print
Nut Free Strawberry Lemon Blender Muffins
Author: Meg Staples
Recipe type: muffin
Prep time:  5 mins
Cook time:  20 mins
Total time:  25 mins
Serves: 6 muffins
 
Ingredients
  • 3 eggs
  • zest of one lemon
  • juice of one lemon
  • 1 cup strawberries, fresh or frozen
  • ¼ cup coconut flour
  • ¼ cup non dairy milk
  • 2 tablespoons coconut oil, melted + more for greasing
  • 1 tablespoon stevia or coconut sugar (optional, for sweetness)
  • ¼ teaspoon baking powder
Instructions
  1. Preheat the oven to 400 degrees
  2. Wash strawberries if needed
  3. Put all ingredients in a blender or food processor and buzz until smooth
  4. Line muffin tin with liners or grease with coconut oil
  5. Disperse batter evenly among 6 muffin cups
  6. note: place ½ strawberry on each muffin for garnish if desired
  7. Bake for 18-22 minutes or until a toothpick comes out clean
  8. *fill empty cups half way with water for more even baking
  9. Allow to cool & enjoy
3.3.2019

nutfreestrawberrylemonmuffins

Filed Under: Breakfast, Desserts & Baked Goods · Tagged: allergen free, breakfast, coconut flour, dairy free, easy, gluten free, grain free, healthy, lemon, muffin, nut free, paleo, snack, strawberry, vegetarian, yeast free

Easy Breakfast Egg Muffins

June 1, 2020 · by Meg · Leave a Comment

Easy Breakfast Egg Muffins

IMG_3149
Being a teacher, breakfast for me has got to be quick. I am completely notorious for hitting the snooze button (more than once) before getting out of bed each morning. I am doing really well after my sugar detox (I lost 5 lbs, and I wasn’t super duper strict after the first week, to be honest, I was using stevia in my coffee…oops!). I highly recommend the 21 Day Sugar Detox if you are struggling with any kind of serious sugar cravings, or you just want to make your eating habits a little more healthy!

So I have been eating these breakfast egg muffins for the past 2 weeks in the morning. They are great for the mornings that I go to this new Crossfit/TRX class that I’ve been trying out at my gym. I can eat them on the way to work after I’ve gotten in the car! Perfect! The great thing is you can roast or saute any veggies of your liking (or even turkey bacon if you’ve got meat eaters on your hands) to put in the cups - and presto, you have a wonderfully delicious and quick breakfast! Low carb and full of protein to keep you full a long time! They are so good, I’ve been eating them cold, but they also reheat wonderfully! I hope you enjoy them just as much as I do!

Print
Easy Breakfast Egg Muffins
Author: Meg Staples
Recipe type: breakfast
Prep time:  15 mins
Cook time:  20 mins
Total time:  35 mins
Serves: 12 muffins
 
Ingredients
  • 12 eggs
  • 2 cups kale, washed and chopped
  • 2 red peppers, washed and chopped
  • 1 bunch of green onion/scallion, washed and chopped
  • 1 cup mushrooms, washed and chopped
  • salt and pepper to taste
  • coconut oil for greasing (or muffin cup liners)
Instructions
  1. Preheat oven to 350 degrees
  2. Wash and chop all veggies (including green onion/scallion)
  3. Saute vegetables until just cooked
  4. Add cooked vegetables and eggs to a large bowl and whisk until well combined
  5. Divide egg mixture evenly among the cups
  6. Place egg muffins in the oven for 20-22 minutes or until a toothpick comes out clean
  7. Enjoy after the muffins have cooled slightly
3.3.2019


paleo21dsdeasybreakfasteggmuffins

Filed Under: Breakfast · Tagged: allergen free, dairy free, easy breakfast, eggs, gluten free, grain free, kale, on the go breakfast, paleo, vegetarian, veggies

21 DSD Cocoa Banana Nut Muffins

May 18, 2020 · by Meg · 3 Comments

I’m still doing the whole 21 Sugar Detox thing! I actually cheated a little bit yesterday after my race. I completed a marathon relay with 4 other great woman on my team, and nine groups of Mom’s Run This Town. SO much fun & I had a blast. Here’s a photo of me & Zoey when I got home. She liked playing with the medal, of course!

So the day was outstanding, except for the fact that I ate some candied walnuts, a slice of cheese pizza and a donut. And then I proceeded to have a pounding headache until I went to bed despite guzzling about 20 million gallons of water. So while I normally feel crappy after eating a dairy product, this one really hit home for me. This whole not eating any sugar thing is working. And clearly making me feel a lot better - and I have lost 4 pounds. So thank you 21 Day Sugar Detox Books & Diane Sanfilippo!

These cocoa banana nut muffins are 21 DSD friendly, so I need to let you know in advance that they are not sweet! repeat: not sweet! I put this recipe together specifically to have something muffin and bread like, because that is a no-no, and going into week 3 I needed something. They definitely satisfy the bread like quality I was going for, but with no sugar involved. The banana and almond butter provide a hint of that, but that’s it, for the most part. Anyways, you’ve been warned! Do not expect otherwise - and happy detoxing!!

Print
21 DSD Cocoa Banana Nut Muffins
Author: Meg Staples
Recipe type: Muffin
Prep time:  10 mins
Cook time:  20 mins
Total time:  30 mins
Serves: 12 muffins
 
Ingredients
  • 1 cup almond flour
  • ¾ cup almond or coconut milk
  • 2 green tipped bananas
  • ¼ cup almond butter
  • ⅔ cup slivered almonds
  • ⅓ cup raw cocao nibs
  • 2 eggs
  • 1 tablespoon cinnamon
  • 1 teaspoon vanilla extract
  • 1 teaspoon baking soda
Instructions
  1. Preheat the oven to 350 degrees
  2. Line or grease muffin tins (with coconut oil or muffin liners)
  3. Put all ingredients except almonds and cocao nibs in the blender or food processor, buzz until smooth
  4. Pour blender contents in a bowl, gently fold in almonds & nibs
  5. Distribute equally among 12 muffin tins
  6. Bake 18-22 minutes or until a toothpick comes out clean
  7. Remove from oven & allow to cool before eating
3.2.2019

cocoabanananut21dsdmuffins

Filed Under: Breakfast, Desserts & Baked Goods · Tagged: 21 day sugar detox, 21 DSD, allergen free, almond butter, banana, breakfast, chocolate, cinnamon, gluten free, grain free, healthy, muffin, paleo, snack, sugar free, vegetarian, weight loss, yeast free

Springtime Vegetable Pot Pie

May 12, 2020 · by Meg · Leave a Comment

Springtime Vegetable Pot Pie

IMG_3069

This isn’t 21 DSD friendly (something I am doing right now, more recipe for that soon) but I made 4 of these Spring Vegetable Pot Pie’s before I went on the detox and stuck them in the freezer (not after having one for my lunch the next few days, of course). I know they will be great go to’s for dinner at the end of the school year with all of the hustle and bustle going on. I opted to make 2 mini pot pies, but you could make one big one if you were feeding a family (double the recipe for 2 or 4, to store in the freezer for later). It’s easy because you throw all the veggies you’d like into a pan with some flour & stock & voila! You have your filling! The crust is a simple recipe I use from The Coconut Mama (no need to reinvent the wheel!). These spring vegetable pot pies are really easy to make and roll out for the top and the bottom of the pies. You can switch up your own veggies, add chicken if you have meat eaters on your hands, etc. Either way it’s a really easy dinner & even more easy to make extra back ups for freezing! Enjoy!

Print
Springtime Vegetable Pot Pie
Author: Meg Staples
Recipe type: Vegetable Pot Pie
Prep time:  20 mins
Cook time:  20 mins
Total time:  40 mins
Serves: 1 pot pie
 
Ingredients
  • 1 small onion, peeled & chopped roughly chopped
  • 2 large carrots, peeled, washed & chopped
  • 1 cup string beans, washed and chopped
  • 2 cups corn from corn on the cob
  • ¼ cup coconut flour
  • 1½ cups vegetable stock
  • ½ cup non-dairy milk
  • ⅔ cup frozen sweet peas
  • 1 tablespoon thyme
  • 1 tablespoon oregano
  • 1 tablespoon rosemary
  • 1 tablespoon coconut oil for cooking veggies
  • salt & pepper to taste
Instructions
  1. Wash & chop all veggies
  2. Prepare pie crust *see recipe for The Coconut Mama’s Coconut Flour Pie Crust above*
  3. In a large pan, heat the coconut oil on medium heat until melted
  4. Add all of the veggies & cook until barely tender
  5. Stir in milk, vegetable stock, coconut flour & spices
  6. Mix until flour is dissolved
  7. Reduce heat & allow to cook for another 5-7 minutes
  8. Change oven temperature from 400 to 375 degrees
  9. Pour filling into the bottom of the pie crust (or 2 small pie pans if desired)
  10. Roll out the remaining pie crust to cover the top
  11. Poke four small slits in the top to allow steam to come out
  12. Spread extra melted coconut oil (1 tablespoons) for a more golden crust
  13. Bake for 17-20 minutes or until edges brown
  14. Enjoy!
3.2.2019

glutenfreepaleovegetablepotpie

Filed Under: Entrees · Tagged: allergen free, coconut flour, dairy free, easy, easy dinner, gluten free, grain free, healthy, nightshade free, nut free, paleo, pot pie, vegetables, vegetarian, veggies, weight loss, yeast free

  • 1
  • 2
  • 3
  • 4
  • Next Page »

Subscribe via Email

Connect with Veggie Staples

  • Email
  • Facebook
  • Instagram
  • Pinterest
  • RSS
  • Twitter

Meet Meg

Hi! My name is Meg, owner and blog writer for Veggie Staples! Thanks for stopping by! I love creating healthy, yummy recipes for everyone to enjoy (meat and non-meat eaters alike)! For more information check out my About Me page. Read More…

Search Recipes

FitFluential Is Fitness Found
myTaste.com

Copyright © 2019 | Innovative by The Pixelista | Built on the Genesis Framework